Make Your Own Favorite Longies
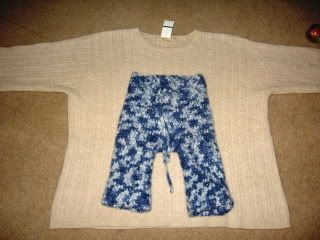
Step 1: Locate a wool sweater and your favorite pair of longies.
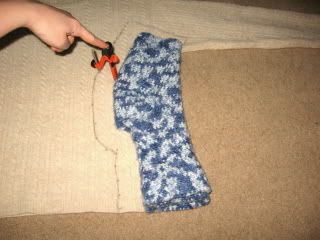
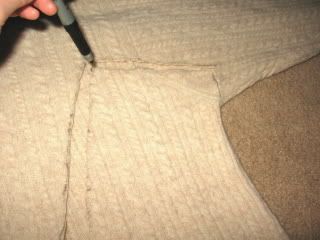
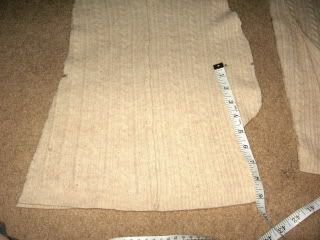
Step 2: Fold longies front to front with back facing out on both sides. Lay at the seam of the sweater. Trace 1/2 - 1 inch out. (Depending on if you are sizing up or want an exact fit. Sizing up is 1 inch. Exact fit is 1/2 inch.) I used a compass and made dots to connect. If your fabric marker fits in your compass, it's easier that way.
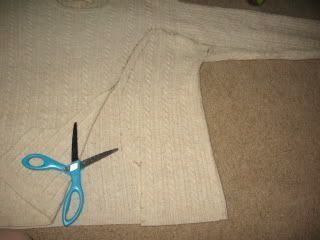
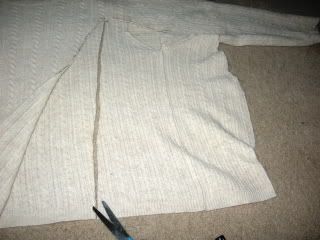
Step 3: Cut top layer only.
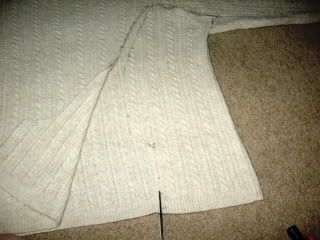
Step 4: Cut bottom layer like top layer up to the curve.
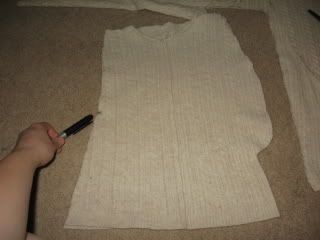
Step 5: Mark the top corner with a small dot.
Step 6: Cut a straight line from lower leg to dot.
Step 7: Use as pattern to duplicate on the other side.

Step 8: Lay two pieces right side together and mark the inseam.
Step 9: Use tape measure to mark inseam on opposite side.
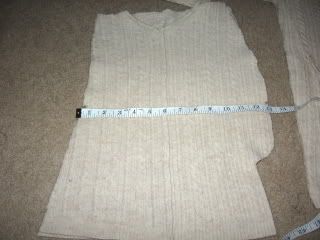
Step 10: Use tape measure as a guide to move the dot to correspond with leg line.
Step 11: This is where your creative side shines through. Freehand a nice curve for ultimate fluffy butt coverage. I haven't found a better way to do this and get the right fit. Any suggestions are welcome!
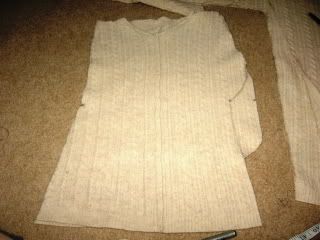
Step 12: Cut out the new fluffy butt. With right sides together, make your way to your sewing machine or serger. If using a sewing machine, I've found that the overlock stitch works best. It looks a little like two straight lines on the outside and a zig zag down the middle. If your machine does not do this, use a straight stitch about 1/4 inch in. Then go back and zig zag edges to prevent the wool from fraying.
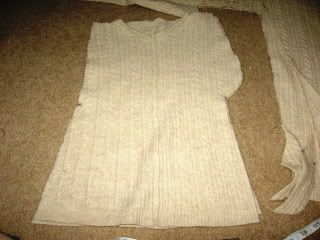
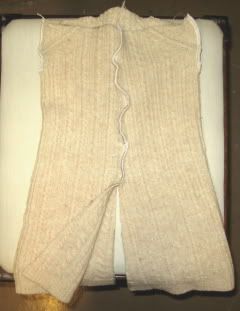
Step 13: Sew straight down the front and down the fluffy butt curve. Stopping at the inseam markings.
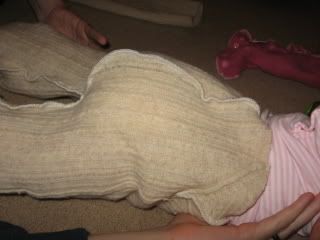
Step 14: Turn together with fluffy butt in back. Since my longies were long enough to make it up into the armpit, I had to serge about two inches from the top on both sides. Now you only have the legs and crotch to seam together.
Step 15: Sew legs and up through crotch.
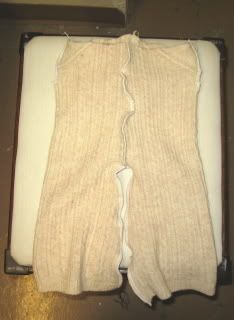
Step 16: Serge or zig zag top.

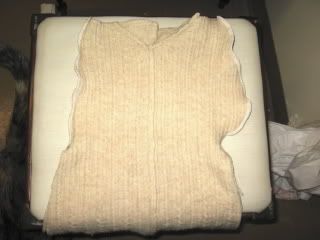
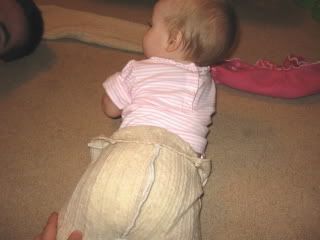
Step 17: Locate baby.
Step 18: Enlist husband's help in distracting the too-busy-baby-who-doesn't-want-to-sit-still. Put longies on inside-out. Measure the rise by folding down to your desired height.
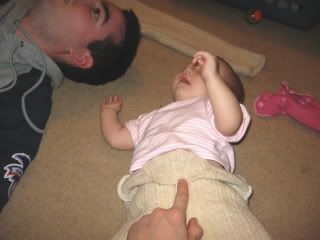
Step 19: Mark rise with fabric marker. Or Sharpie... :)
Step 20: Turn wiggly baby over. Mark rise in back.
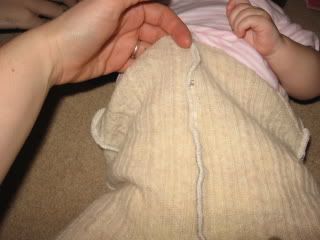
Step 21: Mark any excess fabric that needs trimming. This is for a custom fit. Use the diaper you'll most likely be using under the longies for the best fit. If they are night time longies, you want to make sure you have enough room for the junk in the trunk.
Step 22: Stitch down the top, leaving room for encased elastic. Insert elastic and fit to baby.
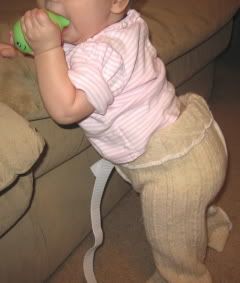
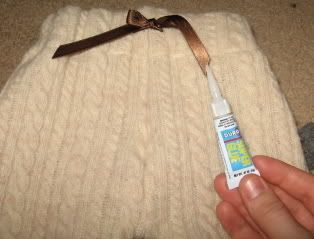
Step 23: For a girly finish (and to mark the front from the back) add a bow.
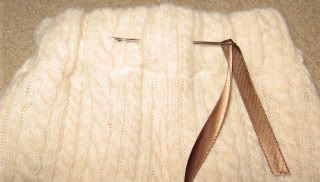
Step 24: Super glue (or some other adhesive) the ends of ribbon to prevent fraying.
Finished product:
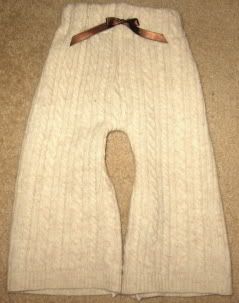
Wash and lanolize and they're ready for wear. Stay tuned for a lanolizing tutorial.
Step 2: Fold longies front to front with back facing out on both sides. Lay at the seam of the sweater. Trace 1/2 - 1 inch out. (Depending on if you are sizing up or want an exact fit. Sizing up is 1 inch. Exact fit is 1/2 inch.) I used a compass and made dots to connect. If your fabric marker fits in your compass, it's easier that way.
Step 3: Cut top layer only.
Step 4: Cut bottom layer like top layer up to the curve.
Step 5: Mark the top corner with a small dot.
Step 6: Cut a straight line from lower leg to dot.
Step 7: Use as pattern to duplicate on the other side.
Step 8: Lay two pieces right side together and mark the inseam.
Step 9: Use tape measure to mark inseam on opposite side.
Step 10: Use tape measure as a guide to move the dot to correspond with leg line.
Step 11: This is where your creative side shines through. Freehand a nice curve for ultimate fluffy butt coverage. I haven't found a better way to do this and get the right fit. Any suggestions are welcome!
Step 12: Cut out the new fluffy butt. With right sides together, make your way to your sewing machine or serger. If using a sewing machine, I've found that the overlock stitch works best. It looks a little like two straight lines on the outside and a zig zag down the middle. If your machine does not do this, use a straight stitch about 1/4 inch in. Then go back and zig zag edges to prevent the wool from fraying.
Step 13: Sew straight down the front and down the fluffy butt curve. Stopping at the inseam markings.
Step 14: Turn together with fluffy butt in back. Since my longies were long enough to make it up into the armpit, I had to serge about two inches from the top on both sides. Now you only have the legs and crotch to seam together.
Step 15: Sew legs and up through crotch.
Step 16: Serge or zig zag top.
Step 17: Locate baby.
Step 18: Enlist husband's help in distracting the too-busy-baby-who-doesn't-want-to-sit-still. Put longies on inside-out. Measure the rise by folding down to your desired height.
Step 19: Mark rise with fabric marker. Or Sharpie... :)
Step 20: Turn wiggly baby over. Mark rise in back.
Step 21: Mark any excess fabric that needs trimming. This is for a custom fit. Use the diaper you'll most likely be using under the longies for the best fit. If they are night time longies, you want to make sure you have enough room for the junk in the trunk.
Step 22: Stitch down the top, leaving room for encased elastic. Insert elastic and fit to baby.
Step 23: For a girly finish (and to mark the front from the back) add a bow.
Step 24: Super glue (or some other adhesive) the ends of ribbon to prevent fraying.
Finished product:
Wash and lanolize and they're ready for wear. Stay tuned for a lanolizing tutorial.
posted by CrunchyChick @ 7:30 PM
![]()


12 Comments:
At 5:31 AM, Anonymous said…
I love you! You're amazing! Love love love those "longies" on Kellie Angel! So cute!!! My sister in law sent my other sister in law the cutest knit sweater (it was hooded and a little open at the top where you could tie it closed) and I've been thinking about it since she showed me. But the problem is I don't kno who to know... or have a baby to put the knitted sweater on. I think I'm pretty much just into baby clothes right now. yes. That's it.
At 8:55 AM, Penny for your thoughts said…
You are on a roll girl. I'm proud of you!!! Make some for Missy Nora too! You are lucky that Kellie isn't allergic to wool. So many of us are! That will keep her really warm this winter. Suggestion... if you put a hem in the bottom of the leg you can let it down if a growth spurt happens. Does Anchorage have Goodwills that you can get some used clothes to use so that you don't have to cannibalize yours? or better yet...freecycle! I will ask Diane if she has any ideas on the one area you wanted input on. She used to make all of her own clothes w/o patterns. Kissez to all
At 12:11 PM, CrunchyChick said…
I buy all my sweaters from Salvation Army. :) They're about two bucks a pop.
At 6:54 PM, Paul said…
Excellent, I likes the part about fitting to baby. It sounds funny :)
At 3:20 AM, Anonymous said…
that is amazing! you are fantastic. now my problem is getting out of texas *where the weather hardly ever permits the opportunity to wear longies* and getting anden a few pairs of those! you need to sell some on etsy.
At 3:25 AM, CrunchyChick said…
What's etsy?? Like HyenaCart?
At 6:52 PM, The Fiskeaux Family said…
This is awesome! Is there a way to use the sleeves to make a second pair? How?
At 2:08 PM, Anonymous said…
i have been flailing around with trying to make wool covers for my babe (2 sweaters in, and 2 funky, not-totally-functional covers...though I did just make some pretty nice nursing pads I think), and was so happy to find your how-to! one question, when you say "mark the inseam" how do I know where the inseam should be? thanks! Carol in Calgary
At 2:54 PM, CrunchyChick said…
Hi Carol! :)
I made this tutorial quickly and with much less thought than I put into my lanolizing tutorial.
When you "mark the inseam" in steps 8 and 9, measure up from the bottom however long you want your inseam+3/8 inch for seam allowance.
For this pair of longies, I wanted an 8 inch finished inseam. So I measured up 8 3/8 inches up from the hem of the sweater.
Good luck sewing longies and thanks for stopping by my blog. :)
At 6:16 PM, Anonymous said…
Thanks very much for this! I was confusing "inseam" with whatever you call the crotch length (ohhh that came out all wrong, I mean from back to front if you catch my drift!) But of course, it makes sense to me now! By the way, your lanolizing tutorial is great, it is actually how I found you, because I couldn't find anywhere else how to tell when the wool needs to be lanolized. Well done! I have bookmarked you :) Carol
At 5:55 AM, Brandi said…
Those are so cute!
At 10:05 PM, Wendy said…
ok...after 6 it got a little fuzzy for me... do you 'open it up' first and then cut the 'straight line'? The pics on 6 and 7 weren't so easy with my eyes to see clearly.
btw I too found you thru your extremely amazing super duper and ideal tutorial for lanolizing. i am in LOVE with people like you who do this kind of thing (same as the wonderful family at www.learningherbs.com) You all use such detailed pics and step by step instructions. it is so easy finally for visual people to GET STUFF NOW!!!! ROFL i am knitting a pair of longies and will need to lanolize. i've always bought new and then never lanolized because well...i never knew how, so never bothered LOL Where does one find lanolin in a small town in canada? ;-) I have lansinoh (sp?) breast stuff that the midwives gave me that i never used...is that the same thing? thanks again! wendy
Post a Comment
<< Home